Artwork requirements
Measure the coaster's white face. Measure the actual usable white face before sizing the cut sheet; the listed 3.75 × 3.75 in dimensions describe the whole coaster, not a guaranteed decorated area.
- Measure the actual white face on the coaster; the listed 3.75 × 3.75 in dimensions are product dimensions, not the decorated area.
- Keep the whole design smaller than the selected EasyPress plate so the single-application instruction can be followed. Cricut does not publish a numeric artwork boundary or inset.
- Mirror the cut sheet design before cutting. Place it face down on the coaster and load the stack with the design side facing up, as the Cricut Square Coaster instructions specify.
No target art size is published; targetSize remains null.
A four-count blank pack and the 12 × 12 in transfer sheet are separate supply bounds. The EasyPress SE Heat Guide selection does not ask for a plate size.
This is a cut-sheet Infusible Ink path and has no printer, bottled ink, or printed sublimation paper.
Source: Cricut, Inc.: Cricut Coaster Blank, Square, item 2006581
This page uses Cricut Coaster Blank, Square, item 2006581, with a pre-inked Infusible Ink Transfer Sheet. It is a cut-sheet workflow, not printer-based sublimation. The listed pack contains four cork-backed blanks, each 3.75 × 3.75 inches. Cricut does not identify the coaster body material in the inspected listing or give a decorated-face measurement. That makes this project different from the MakerFlo leatherette coaster, which uses printed sublimation and a named mini press.
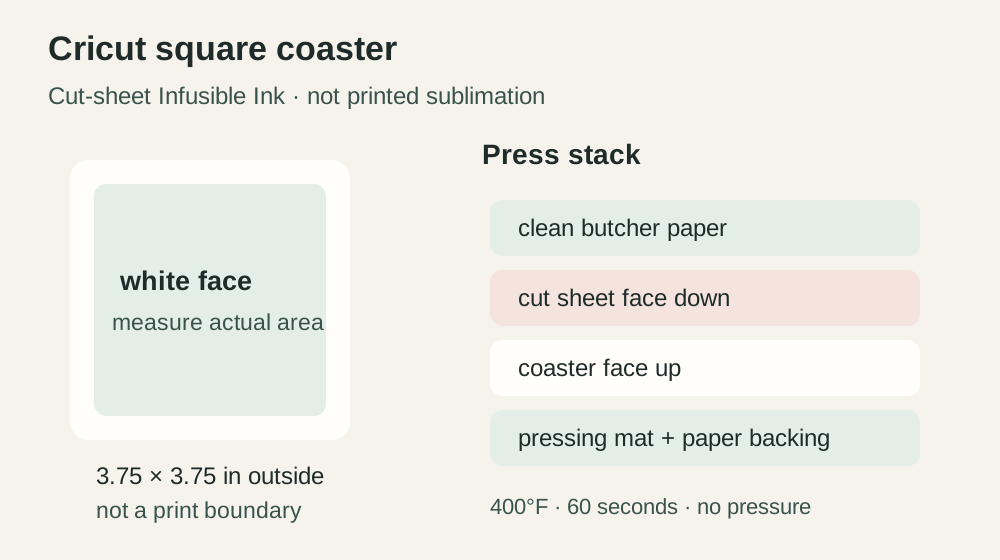
Measure the white face
Measure the actual usable surface on the coaster you will press. The product’s 3.75 × 3.75 inch size describes the whole item, not a guaranteed image area. Keep the complete design smaller than the EasyPress plate because Cricut calls for one application rather than pressing in sections. No source gives a numeric safe inset or a recommended art size.
Cut and secure the sheet
Mirror the artwork, put the black transfer sheet liner-side down on StandardGrip, cut it, crack-weed the excess, and trim the clear liner close to the design. Cricut’s FAQ says to tape Infusible Ink designs on coasters, so this BOM includes item 2006951 Heat Resistant Tape. The Maker 4 Machine Only listing includes a LightGrip mat, while the Infusible Ink workflow calls for StandardGrip; the six-pack is a separate line.
Build the coaster stack
Wipe the blank with a lint-free cloth. Cricut’s Square Coaster instructions put the transfer image face down on the white face, then load the coaster with that design face up in the pressing stack. Do not flip it as Cricut directs for its separate Ceramic Coaster process. The Heat Guide lists a Cricut Pressing Mat, white 80 lb cardstock or four butcher-paper layers, and clean butcher paper as the top cover; follow its displayed stack order. The BOM includes a named Cricut Butcher Paper pack and treats cardstock as a generic optional backing material.
Press and cool
The U.S. Heat Guide result checked September 23, 2026 gives 400°F for 60 seconds with no pressure. It selected EasyPress SE by family name and did not ask which plate size you own. This plan lists the 12 × 10 inch SE SKU; Cricut’s EasyPress FAQ says SE works like EasyPress 2 and supports Infusible Ink, while the exact coaster listing recommends EasyPress 2 or a press that reaches 400°F. This is cross-source support for the chosen setup, not a size-specific Heat Guide result. Lift slowly without shifting the stack, then let the very hot coaster cool completely before handling or peeling.
Cricut’s care note permits glass cleaner and warns against steel wool, colored cleaning agents, and scrubbing pads. The listing also says the blank is for adult use only. No physical press test is claimed.
Save and price the plan
A BOM quantity of 1 means one four-coaster blank pack, one two-sheet black transfer pack, one six-count StandardGrip pack, one Maker 4 Machine Only, one EasyPress SE 12 × 10, one EasyPress Mat, one 15-sheet butcher-paper pack, and one Cricut tape roll. The selected U.S. pages displayed $8.39 for the coaster pack, $8.39 for the transfer sheets, $379 for Maker 4 Machine Only, $119 for the press, $15.99 for the StandardGrip pack, $10.99 for the EasyPress Mat, $10.99 for butcher paper, and $7.99 for tape on September 23, 2026. These are dated page observations; stock was not stated for those selected items, and they are not a live basket or total. Generic cloth, scissors, tweezers, and optional cardstock have no named SKU or price. Use the project pricing calculator with the number of sheets and blanks you actually consume, then save the project or print it from the page actions. The design-size helper converts measurements you enter; it does not measure the blank.
Related projects
For another cut-sheet project, see the Cricut Infusible Ink cosmetic bag. For a printed transfer and leatherette surface, compare the MakerFlo coaster plan. Read the Infusible Ink and heat-transfer method guide to keep the two process paths separate.
Page address: https://makepressrepeat.com/projects/infusible-ink-square-coaster
Sources and review date
Cricut’s product, help, and U.S. Heat Guide pages were checked on September 23, 2026. This source-based plan has not been physically tested. The diagram is original artwork, not a supplier template.