Artwork requirements
Measure the tote's flat front. Measure a clear flat area on this medium tote before sizing the cut sheet, avoiding seams, handles, and folds; its 14 × 14 in outside dimensions do not define a decorated area.
- Measure the flat front area on the actual medium tote and avoid seams, handles, and folds. Cricut does not publish a numeric decorated-area rectangle for this item.
- Keep the design within the selected transfer sheet and Maker 4 cut limits, and smaller than the heat plate. Cricut says to make one application rather than pressing in sections.
- Mirror the cut image before cutting, as required by Cricut’s Infusible Ink sheet instructions.
The published 14 × 14 in size is the tote’s outside size, not the decorated area.
The 12 × 12 in transfer sheet, 11.5 × 23.5 in Maker 4 maximum cut size on a mat, and 12 × 10 in EasyPress SE plate are separate constraints.
No physical test result or universal tote artwork size is claimed.
Source: Cricut, Inc.: Tote Bag Blank, Medium item 2006830
This is a Cricut Infusible Ink project, not a printer sublimation transfer. The selected Black Transfer Sheets are pre-inked and cut with a Cricut machine; the bill of materials therefore has no sublimation printer, bottled ink, or printed paper. The exact Cricut medium tote blank is item 2006830 and its listing gives 100% polyester with a 14 × 14 inch outside measurement. That outside size does not define a decoration area.
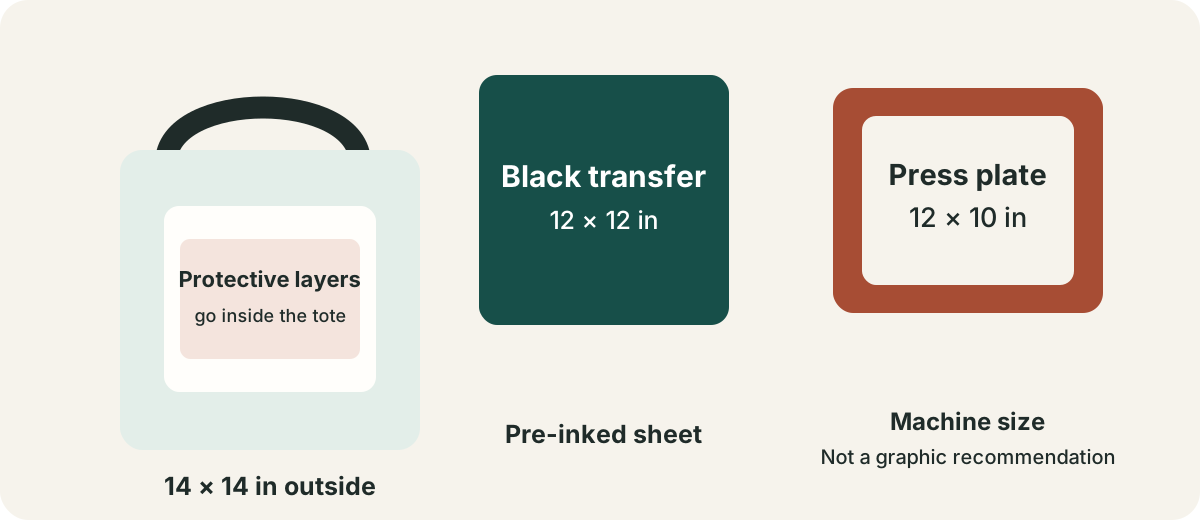
Measure the flat area
Choose a smooth flat area on the actual front of the tote and measure it before designing. Keep the artwork clear of seams, handles, and folds. Cricut does not publish a numeric decorated-area rectangle for item 2006830, so neither the 14 × 14 inch outside size nor the 12 × 10 inch press plate is a suggested graphic size. Check the selected sheet and cutter limits separately. The design must also be smaller than the plate, and Cricut says to complete one application rather than pressing in sections.
Cut and prepare the tote
Mirror the artwork and cut the pre-inked transfer sheet liner-side down on the StandardGrip mat. Crack-weed the sheet and trim the clear liner close to the design. The Maker 4 Machine Only listing describes a LightGrip mat; Cricut’s Infusible Ink FAQ requires StandardGrip for these sheets. The item page lists the Maker family, while broader FAQ evidence supports compatible cutter families; it does not name Maker 4 item 2011084 individually.
Set up the tote on a firm, level surface with the Cricut Pressing Mat and white 80 lb cardstock or four layers of butcher paper inside the bag as Cricut specifies. Lint-roll the full surface and cover it with clean butcher paper. Cricut also lists scissors and tweezers. The BOM includes the exact Cricut Butcher Paper pack; lint roller, scissors, tweezers, and optional cardstock are generic requirements without manufacturer-specific SKUs or prices.
Apply the transfer
Cricut’s U.S. Heat Guide result checked on September 23, 2026 selected EasyPress SE, Infusible Ink Transfer Sheet, Tote Bag, and Cricut Pressing Mat. It returned a 15-second preheat followed by 385°F for 40 seconds at Firm pressure. The selector does not ask which SE plate size is used; the BOM lists the 12 × 10 inch model. The tote product page lists EasyPress 2/3, not SE. Cricut separately says SE works like EasyPress 2, so the SE use here is supported by that cross-source evidence and the dated Heat Guide result.
Keep the EasyPress still for one application, then lift slowly. Cricut’s Heat Guide says remove the liner while warm, while its separate Infusible Ink how-to says to cool completely before removing the paper and liner slowly. The source instructions conflict; check the current directions and do not combine their timings into a new rule. After the transfer cools, wash inside out in cold water with mild detergent. Tumble dry low or line dry; Cricut says to avoid fabric softener, dryer sheets, and bleach. Cricut recommends ventilation because heating vapors may irritate sensitive people.
Save and price the plan
A BOM quantity of 1 means one Medium Tote Blank, one two-sheet transfer pack, one six-count StandardGrip mat pack, one Maker 4, one EasyPress SE, one EasyPress Mat, and one 15-sheet Cricut Butcher Paper pack. Cricut recommends a new sheet for each transfer; the inside layers may use four butcher-paper sheets or the optional generic 80 lb cardstock line, while the top cover still needs clean butcher paper. Generic lint roller, scissors, tweezers, and cardstock have no named manufacturer SKU or price. The Cricut product pages showed the selected tote at $6.59, Black transfer sheets at $8.39, Maker 4 Machine Only at $379, EasyPress SE 12 × 10 at $119, StandardGrip six-pack at $15.99, EasyPress Mat at $10.99, and Cricut Butcher Paper 15-pack at $10.99 on September 23, 2026. Availability was not stated for those selected offers, so these are dated price observations rather than a current basket or project total. Save the project in this browser, print it from the action bar, and open My setup to export the workspace. Use the project pricing calculator with current prices and your own labor and workbench supplies.
Page address: https://makepressrepeat.com/projects/infusible-ink-tote
Sources and review date
Cricut’s product, help, and Heat Guide pages were checked on September 23, 2026. This source-based plan has not been physically tested. The diagram is original artwork, not a template.
Continue with the Cricut Infusible Ink T-shirt project or browse all projects.