Press a MakerFlo 18-ounce Hydro bottle

A source-backed project for the MakerFlo 18-ounce Hydro bottle and Automatic Tumbler Press, with exact dimensions, settings context, a documented print path, and explicit artwork limits.

Planned finished item

One sublimation transfer on the straight MakerFlo 18-ounce Sublimation Hydro Water Bottle, pressed with the MakerFlo Automatic Tumbler Press.

MakerFlo 18-ounce Sublimation Hydro Water Bottle

Source: MakerFlo: 18oz Sublimation Hydro Water Bottle

MakerFlo template canvas width
9.55 in
Source: MakerFlo: Free Sublimation Tumbler Templates
MakerFlo template canvas height
7.1 in
Source: MakerFlo: Free Sublimation Tumbler Templates

Artwork requirements

Supplier template canvas guidance: 9.55 × 7.1 in.

A template canvas is artwork guidance, not a measurement of the blank's usable decorated area.

  • Use MakerFlo's 9.55 by 7.1-inch template canvas as source guidance, then confirm file orientation and print layout in the selected printer.
  • Keep the supplier template canvas distinct from the bottle's usable coated area and printer's driver-dependent printable bounds.
  • Mirror the image and attach it with heat-resistant tape as the press manual instructs. Remove the lid and straw before pressing.

MakerFlo calls 9.55 by 7.1 inches a design-template size and lists 8.5 by 11-inch paper as the minimum, not a maximum printable surface on the bottle.

The coated area's physical bounds remain unverified by the cited product and template pages.

The schematic shows only outer bottle dimensions and must not be used as a print template or scale reference.

Source: MakerFlo: Free Sublimation Tumbler Templates

Bill of materials

Equipment

Source-scoped starting settings

dye sublimation · MakerFlo Automatic Tumbler Press

Temperature
355 F
Time
60 seconds
Pressure
Not specified in the cited instruction
  • Turn 180 degrees and press for another 60 seconds.
  • MakerFlo displays a separate general 365°F/40-second resource instruction for tumblers. Show both source contexts; do not auto-select.
  • Test tumblers before the final project.
  • Handle carefully and use a heat glove.
  • MakerFlo's exact automatic tumbler-press manual says to mirror the image, secure it tightly with heat-resistant tape, remove the lid and straw, keep nonremovable heat-resistant parts at least 1.5 cm from the heating element, and follow the illustrated start/load/remove-after-beep sequence.
  • The manual's generic Water Bottle table lists 180°C/356°F for 60 seconds and does not state rotation/repeat; this differs in scope from the exact 18oz blank page's 355°F/60-second cycle followed by a 180° rotation and another 60 seconds. Keep the exact blank instruction as the setting and show the manual table separately.

Conflicting source instructions

The exact product page’s MakerFlo Automatic Tumbler Press section gives 355°F/60-second repeat cycles; a separate general Maker Resources Press block gives 365°F/40-second repeat cycles without naming a press model. Show both contexts; do not auto-select. A separate exact-press manual has a generic Water Bottle row at 180°C/356°F for 60 seconds with no stated rotation/repeat; keep that manual row visibly separate from the blank-specific listing rather than interpreting it as a one-pass total. Source: MakerFlo: 18oz Sublimation Hydro Water Bottle; MakerFlo: Manual for Auto Tumbler Heat Press

Checked . Source: MakerFlo: 18oz Sublimation Hydro Water Bottle; MakerFlo: Manual for Auto Tumbler Heat Press

Ordered steps

  1. Step 1

    Confirm the blank is the straight MakerFlo 18-ounce Hydro bottle and measure it. Its listed 2.96-inch diameter and 9.19-inch height fall within the press page's 2.8–3.4-inch diameter and 9.5-inch maximum length range. Do not substitute a tapered blank based on capacity alone.

    Source: MakerFlo: 18oz Sublimation Hydro Water Bottle; MakerFlo: Tumbler Press

  2. Step 2

    Use MakerFlo's 9.55 × 7.1-inch template canvas for the file boundary, then check the physical coated area with the supplier before production. The listing does not establish the coating's printable bounds. The original diagram shows only the bottle's outside dimensions. Check the template against the nominal F570 Letter auto-feeder interior and follow the printer's current sizing and orientation directions.

    Source: Epson America, Inc.: SureColor F570 User's Guide; MakerFlo: 18oz Sublimation Hydro Water Bottle; MakerFlo: Free Sublimation Tumbler Templates

  3. Step 3

    For the documented print path in this project, use an Epson SureColor F570 with genuine Epson T49M sublimation ink and paper that lists the F570 as compatible. The F570 User's Guide lists Letter sheets for its auto sheet feeder and calculates an 8.26 × 10.76-inch interior from specified 0.12-inch margins; application, driver, OS, or layout settings may reduce what actually prints. The MakerFlo 9.55 × 7.1-inch template canvas fits within that nominal interior when oriented as 7.1 × 9.55 inches, but this dimension check does not establish the bottle's usable coated area.

    Source: Epson America, Inc.: SureColor F570 Dye-Sublimation Printer; Epson America, Inc.: SureColor F570 User's Guide; MakerFlo: MakerFlo Sublimation Paper 120GSM, 8.5 × 11 in, 100 sheets

  4. Step 4

    Follow the press manual: mirror the print, remove the lid and straw, and secure the transfer tightly with heat-resistant tape. Keep any nonremovable heat-resistant part at least 1.5 cm from the heating element. The press listing says its automatic pressure removes the need to tape, which conflicts with the linked manual's taped workflow; this project follows the manual and flags the difference for confirmation. MakerFlo advises testing tumblers before a final project, so include a second matching blank for the test.

    Source: MakerFlo: 18oz Sublimation Hydro Water Bottle; MakerFlo: Manual for Auto Tumbler Heat Press; MakerFlo: Tumbler Press

  5. Step 5

    Follow the bottle page section named for the MakerFlo Automatic Tumbler Press: 355°F for 60 seconds, rotate the tumbler 180 degrees, and press another 60 seconds. Pressure is not specified. This is an exact supplier-documented starting point, not a physically tested result or universal tumbler recipe. The press manual separately lists a generic Water Bottle row at 356°F for 60 seconds, without an exact blank or a rotation/repeat instruction; keep that generic row distinct and check with MakerFlo if its scope conflicts with the exact blank page.

    Use the listed settings context.

    Source: MakerFlo: 18oz Sublimation Hydro Water Bottle; MakerFlo: Manual for Auto Tumbler Heat Press; MakerFlo: Tumbler Press

  6. Step 6

    Power on the press, set the specified time and temperature, and load the taped bottle into the heating attachment as it reaches temperature. Start the press and remove the bottle after the completion beep, using a heat glove. The manual's illustrated press sequence ends at removal; it does not set a cooling time or paper-peel sequence for this blank.

    Use the listed settings context.

    Source: MakerFlo: 18oz Sublimation Hydro Water Bottle; MakerFlo: Manual for Auto Tumbler Heat Press

  7. Step 7

    With a heat glove, let the tumbler cool briefly, then carefully peel away the tape and transfer. MakerFlo describes this finishing technique in its separate 20-ounce Skinny walkthrough; it is general technique, not a model-specific 18-ounce Hydro cooling duration or setting. Follow any updated exact-blank safety instructions if they differ.

    Source: MakerFlo: 18oz Sublimation Hydro Water Bottle; MakerFlo: How to Sublimate a 20oz Skinny Tumbler

  8. Step 8

    After the cooldown and careful transfer removal, compare the result with the artwork and record the blank, press, printer, paper, settings, and visible result. Do not change settings by guesswork if the test needs adjustment.

    Source: MakerFlo: 18oz Sublimation Hydro Water Bottle; MakerFlo: How to Sublimate a 20oz Skinny Tumbler

Completion checks

Troubleshooting

A different MakerFlo tumbler temperature or cycle appears in a chart.

  • The 355°F/60-second repeat instruction is in the exact bottle page section for the MakerFlo Automatic Tumbler Press.
  • A separate general resource gives 365°F/40-second repeat cycles without naming a press; the oven section gives another oven-specific process. Do not combine or swap values without exact supplier direction.

Source: MakerFlo: 18oz Sublimation Hydro Water Bottle

The test transfer is incomplete or needs an adjustment.

  • Verify the blank and exact press pairing, printer-paper setup, artwork fit, and current supplier directions before another attempt.
  • Do not add time, raise temperature, or repeat by guesswork; MakerFlo recommends testing tumblers and publishes no adjustment in the cited press section.

Source: MakerFlo: 18oz Sublimation Hydro Water Bottle

Use this project to plan a single transfer on the MakerFlo 18-ounce Sublimation Hydro Water Bottle with the MakerFlo Automatic Tumbler Press. MakerFlo describes the bottle as straight, double-wall, vacuum insulated, BPA-free, and coated for sublimation. Its listed 2.96-inch diameter and 9.19-inch height fall inside the press page's stated geometry, and the bottle page names this exact press in its settings section. The listed dimensions do not establish usable coating area. This is a source-based plan, not a claim that the combination was physically tested.
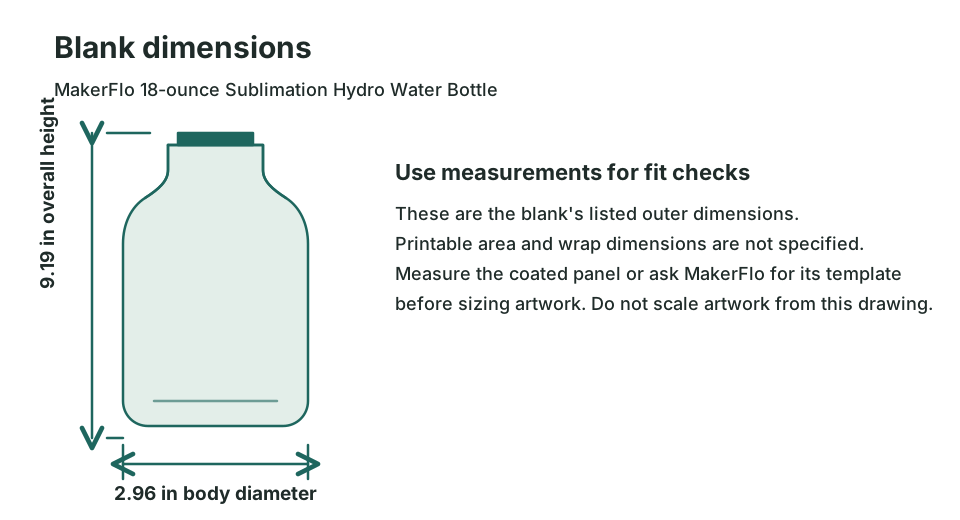
Original schematic showing only the bottle's listed 9.19-inch overall height and 2.96-inch body diameter; MakerFlo's template canvas is separate from measured coating coverage.

Choose a documented print path

The bill of materials uses one documented print setup: an Epson SureColor F570 with genuine Epson T49M dye-sublimation ink and MakerFlo 8.5 × 11-inch sublimation paper. Epson lists the F570 as a 24-inch dye-sublimation printer, the ink supplier lists T49M bottles for this model family, and MakerFlo lists the selected paper as compatible with the F570. This is a source-linked setup, not a purchase recommendation; if you use another printer, verify the exact ink, paper, software, and blank instructions for that system.

Epson's User's Guide says the F570 ships with initial ink bottles and that some ink is consumed while charging the print head. The four T49M colors in the BOM describe the required ink system; they do not imply four extra bottles must be purchased. Check the exact printer package and remaining ink before pricing or ordering replacement bottles.

MakerFlo's template chart lists a 9.55 × 7.1-inch canvas for the 18-ounce Hydro bottle and says to use at least 8.5 × 11-inch paper. The F570 User's Guide lists Letter sheets for its auto sheet feeder and specifies 0.12-inch cut-sheet margins on each side, yielding a calculated nominal interior of 8.26 × 10.76 inches. The template canvas fits within that nominal interior when oriented as 7.1 × 9.55 inches, though application, driver, operating-system, and layout settings may reduce the actual print area. These are paper and template dimensions, not a measurement of the bottle's coated usable area; confirm the file orientation before printing.

Measure the artwork area

MakerFlo's 9.55 × 7.1-inch figure is the supplier's template canvas, not a physically measured printable area or a guarantee that the coating extends across the full canvas. Use the supplier template or chart guidance as the artwork file boundary, then confirm the blank's coated area and placement with MakerFlo before production. Do not calculate a design width from nominal diameter or scale the original schematic; it labels only the blank's outside dimensions.

The MakerFlo press page lists a supported drinkware diameter of 2.8–3.4 inches and a maximum length of 9.5 inches. The bottle's listed diameter and height fall inside those bounds. This is a dimensional fit check, not a measured pressure or transfer-quality result; the press page's automatic-pressure description does not establish a user-adjustable pressure value for this project.

Keep the setting with its source

On the bottle page, “Using the MakerFlo Automatic Tumbler Press” gives 355°F for 60 seconds, rotate 180 degrees, then press for another 60 seconds. A separate Maker Resources block gives 365°F for 40 seconds, rotate, then another 40 seconds without naming an exact press. The oven section gives 375°F for 5–6 minutes in a separate oven context. This project uses only the explicitly named press instruction as its supplier-documented starting point; it does not merge the press, general-resource, or oven values. Pressure is not specified, and no independent physical test has been performed.

Before pressing, follow the MakerFlo press manual: mirror the image, remove the lid and straw, keep any nonremovable heat-resistant parts at least 1.5 cm from the heating element, and secure the transfer tightly with heat-resistant tape. The press product page says its automatic-pressure system removes the need for tape, which conflicts with the linked manual's taped workflow. This project follows the manual's operation steps and flags the discrepancy; confirm current directions with MakerFlo if needed. The BOM identifies MakerFlo's Wide 0.78-inch Sublimation Heat Tape, sold as a one-roll option. The page shows no manufacturer SKU and its availability widgets conflict.

The manual's illustrated sequence is to power on the press, set time and temperature, load the item as the press reaches temperature, start the cycle, and remove the item after the completion beep. Use a heat glove. MakerFlo's separate 20-ounce Skinny walkthrough says to let the hot item cool briefly, then carefully peel away the tape and design. This is general finishing technique from a different tumbler walkthrough, not an exact 18-ounce Hydro cooling duration or setting. The exact blank page remains the source for the 355°F, 60-second, rotate 180 degrees, repeat 60-second instruction; the manual's generic Water Bottle row is 356°F for 60 seconds without a blank identity or rotation instruction. Do not combine those settings. MakerFlo advises testing tumblers before a final project, so budget for two matching blanks, one for the test and one for the final item.

Record the result and cost

MakerFlo's US bottle listing showed US$10.95 for the single-item option alongside an inventory count and a Sold Out/restock notice on 2026-09-22, so current availability is unknown. Its press listing showed US$149.95 beside a conflicting stock count and Sold Out notice on the same date. These are dated page observations, not current offers or a complete project cost. For costing, use per-attempt material costs rather than the whole seller package. Use the project pricing calculator with your actual blank, paper, ink, labor, and overhead costs; this page supplies no cost or profit result.

Sources and review date

The product and instruction pages below were checked on 2026-09-22, except for the Epson F570 User's Guide, checked on 2026-09-23. Facts are paraphrased; product photos and supplier templates are not reused. The diagram is original and illustrative.

Related reading: choose a heat press for sublimation and compare sublimation printers.